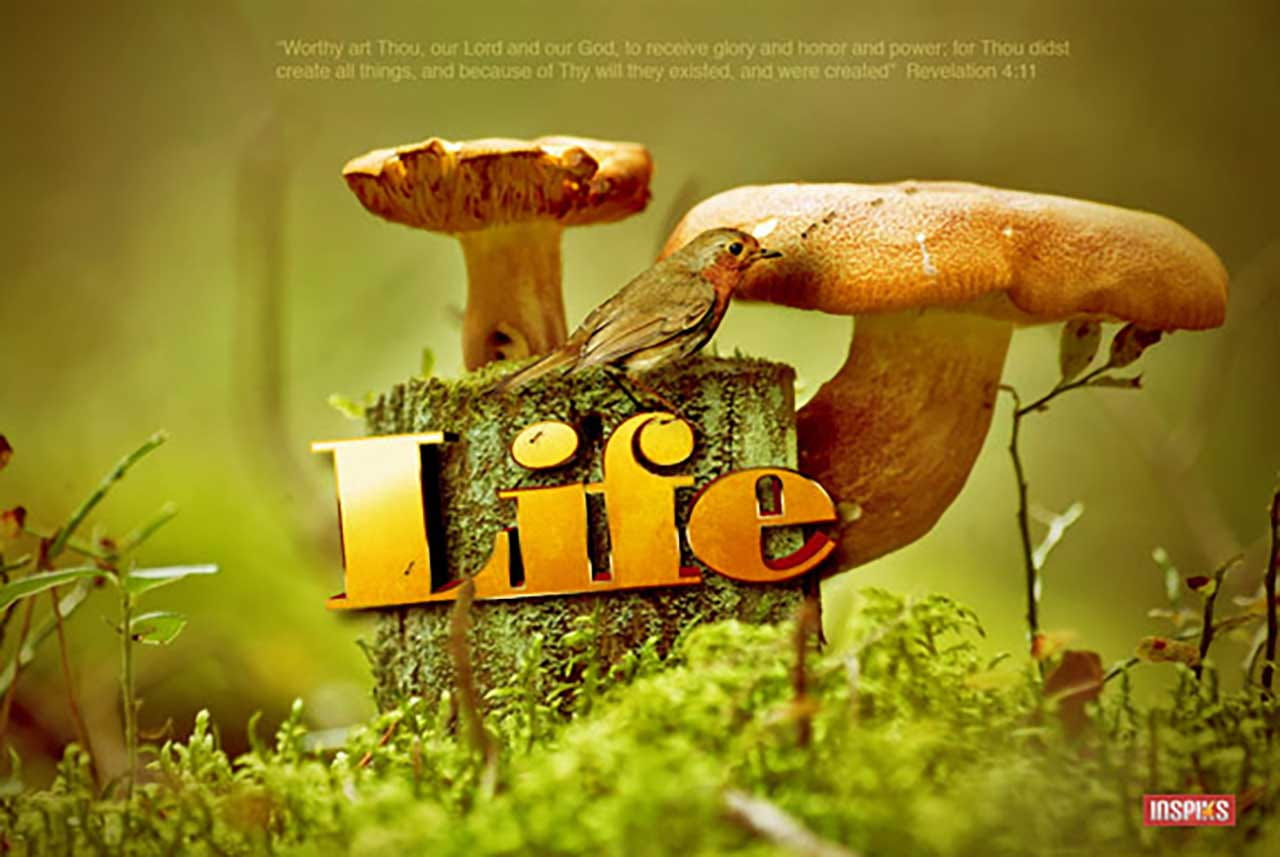

Xara 3D Type in a Wallpaper Project: Photo manipulation is always fun, it opens the spectrum of what we can create in Photoshop and allow our imagination to run wild! Today we will be re-creating a wallpaper called “Life”. In this wallpaper, I used some simple techniques to pull all my elements together, like 3D typography from Xara3D, and a few images. The inspiration for this image came from a reflection on how we can see the majesty of God in creation. Every living thing has a purpose in the circle of life, and we can’t help, but give God the glory and honor!
Worthy art Thou, our Lord and our God, to receive glory and honor and power; for Thou didst create all things, and because of Thy will they existed, and were created.
Revelation 4:11
Final Image
Skill Level
Intermediate
Resources
Xara3D
Mushroom Image From Stock.xchng
Robin Image From From Stock.xchng
Ant image From From Stock.xchng
3D Text by loswl
Grunge Wall Texture 25 by Stock.xchng
Step 1:
Launch Xara 3D.

Click on the first Text Design Option button to change the Text Design Style to No Style

Step 2:
Click on the Text Edit Button, to start formatting your type

Type the word “Life” or any word that goes along with your project. I used the font, “Bodoni MT Black”. Click OK when you’re done editing.

Step 3:
Use the Extrusion tool to extrude your text, by dragging with the mouse tool, after you see the curser show up over the text.
Extrusion Options: Depth 52, leave everything else at the default settings.

Step 4:
Create a subtle bevel by changing the Bevel Options to 60′ Bevel, Depth: 9

Step 5:
Remove the default shadow, we will add a custom shadow in Photoshop.

Step 6:
Change the lights by activating the Show/Hide Lighting, and move each light by dragging them to the desired position (see image below). To change the color of each light, Double Click, the light then change the colors in the Color Options dialog box.
Hex Colors used:
Light1: #66001B
Light2: #000000
Light3: #F4F7EE

Step 7:
Now we will set the quality settings for Exporting the 3D type. Click Window > Quality Settings, Set the Export Quality to Highest and leave all other options to the default settings. Export your 3D Type by clicking File > Export. Set the name of the file as “Life” in the dialog box, set the file type as .PNG., and click Save.

The Export dialog Box will open. Follow the settings in the image below and click Save

Step 8:
We will do the rest of this project in Photoshop. Open the Mushroom Image From Stock.xchng. This particular image is very good, so we do not need to do much editing. First remove the blurred image of the large insect on the mushroom to the left, with the Clone Stamp Tool. Select the Clone Stamp Tool, make the brush a soft brush at 28px, then Alt Click on an area close to the mushroom (see image below) and start brushing softly over the insect.

Step 9:
Darken the corners of the image by creating a vignette. Create a new layer, then create a radial Transparent Gradient.
Foreground Color #ffffff
Background Color #000000

Click on the Gradient Tool and select and apply the Radial Transparent Gradient by dragging from the center of the document to the left edge. Erase the center of the gradient with a large soft brush. Set the layer to 60% Opacity.

Step 10:
Open the “Life 3D”.png file, and change the Color Mode to RGB, by clicking Image > Mode > RBG. Place the 3D “Life 3D”.png image into the Mushroom document.

Scale and Rotate the 3D Type to the left a bit, to match the image below. Click Edit > Transform > Scale, to Scale and Rotate.

Select the white face of the 3D Text with the Magic Wand tool.

Step 11:
Create a New Layer above the 3D text, name the layer “Effects” and color the selection Black with the Paint Bucket.

Add some Layer Styles to the “Effects” Layer. Double-click the “Effect” layer to open its Layer Styles options dialog box. Apply the options below.
Gradient Overlay Hex Colors:
- #bc4b00
- #efa01e
- #f4d9a5
- #fbf0eb

Gradient Stroke – Fill Type Gradient
Hex Colors:
#471600
#f6dcc7
#020202
#9b9696
#edba70

The result should look like the image below.

Step 12:
Now we will give the type some texture. Open the Grunge Wall Texture 25 by Stok.xchng. Control-click the “Effects” Layer to make a selection of it.

Leave the selection active and Create a new layer and name it “Texture”. Copy the Grunge Wall Texture 25 by Stok.xchng paste it into the selection. Edit > Paste > Into.

Re-size the image then reduce the Opacity of the texture to 59% and change the layer style to Overlay.

Step 13:
Now we will add some other elements to the composition, to give the scene a little more life. Open the Robin Image From From Stock.xchng. Use the pen tool to draw a path around the Robin.

Switch to the Paths tab and load the path as a selection by clicking the dotted circle icon at the bottom of the menu.

Copy the Robin and paste it into your work document. Select and delete the area between the legs of the robin and position the legs on the “F”.

Lower the Saturation of the Robin, so it matches the rest of the scene.

Step 14:
Open the Ant image From From Stock.xchng. Select the white areas of the image with the Magic Wand tool.


Invert the selection, select, Selection > Inverse. Copy the ant to your working document, then arrange copies of the ant just like the image below.

Step 15:
No, we will place the blurred branch that is lying behind the 3D type, to the front, to create some depth. First, copy the background image and place the copy right above the 3D type layer.
Step 16:
Now that we have the image above the 3D Type we will create a mask and paint in that blurred branch. Click Layer >Â Layer Mask > Hide All. The image will seem to disappear, but it is just masked out with black. Now we will paint back the section of the image that we want, with a small soft brush, 46 pixels at 92% opacity.


Step: 17
Now we will blend everything together with a Color Balance layer. Choose the top layer in your Layer Palette then, Click on the “Half Moon” icon at the bottom of the Layer Palette and choose Color Balance from the menu. Change the following.
Cyan +53, Magenta +45, Yellow -100

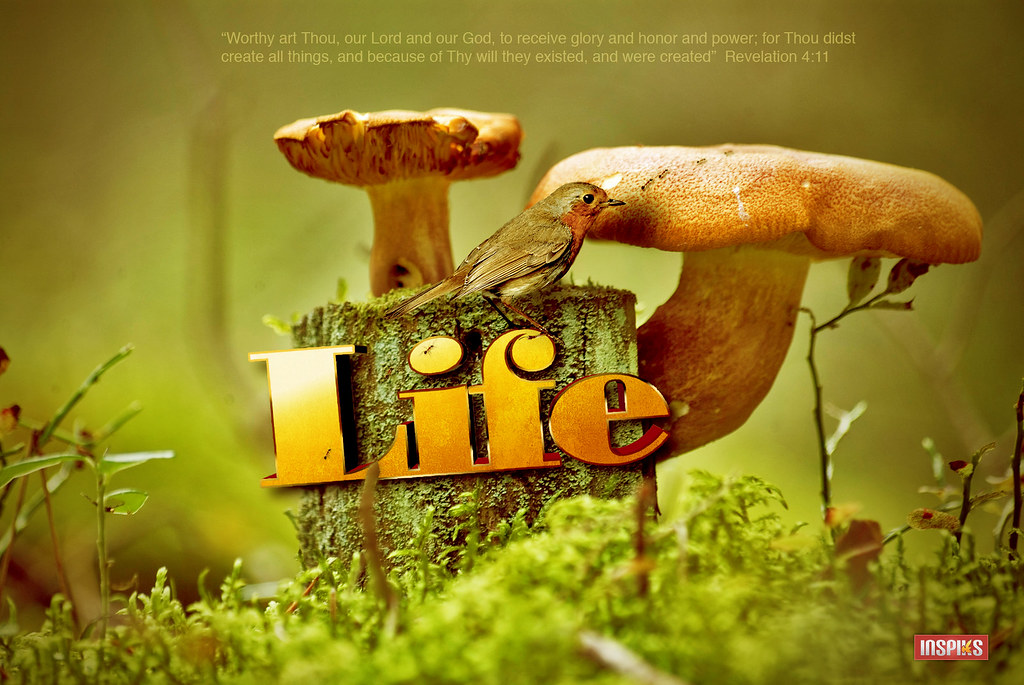
Final Image

Conclusion
We successfully completed our photo manipulation/composition project. As you can see Xara3D is so simple to use, literally, anyone can produce high-quality 3D graphics in minutes, combined with Photoshop, you can create some eye-catching results!!


15 thoughts on “Blending Xara 3D Type in a Wallpaper Project”
Superb tutorial. Thanks for sharing!
Nice tutorial. Liked the combination of typography with photography.
Beautiful final product. Amazing attention to detail.
Very cool use of Xara!
– John
Nice tutorial, Thank you 😀
Thanks Mr… I download right now… thanks again for you time …
thanks but the mushroom image dont exist, or something bad happen, because when I click on the link showme a “legend” “you cant download this image” ????
any idea please ?
thanks
OK, seems like Stock.xchng is having some issues, I updated the link, so now you can download it.
awesome! master at work :), nice tut, great inspiration.
Amen. Thats a blessing in which you boldly stand on the Word of God and giving him praise through graphic design. Great tutorial
Thanks for checking out the tut, thanks for the word of encouragements, really means a lot 🙂
Great Tutorial
Nice tuts. That composition is wild. Thanks for sharing the usage of Xara 3D. I wonder, do they have a mac version?
happy you found it useful, unfortunately they have not released a Mac version, that would be cool 🙂
Very nice tut, love all the details you placed into each explanation!! I will be trying this out when I get home 🙂
Thanks for the compliments, hope to see your results 🙂