
Create a Magazine Cover using Photoshop and InDesign CS5: This tutorial will demonstrate how to create a magazine cover. We will be using Photoshop and InDesign to create different aspects of the cover. My last magazine cover tutorial was created using only Photoshop. In this version we will use InDesign for better type management and Output for printing. Let’s get started!
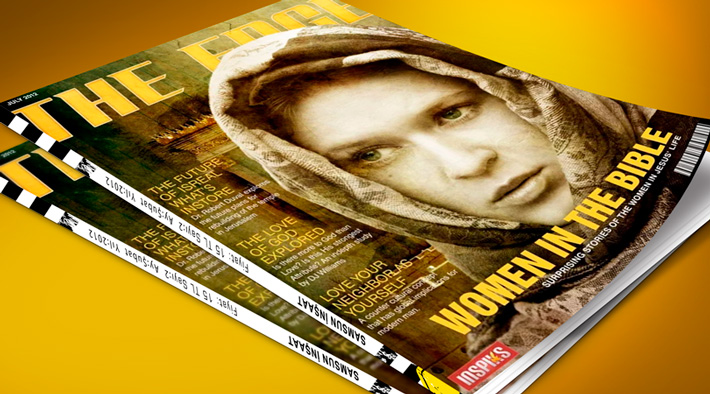
Final Image

Resource
Second Jerusalem Temple model from Stock.xchng
Portrait Girl in a Scarf from Stock.xchng
Gold Grunge 5 from Stock.xchng
Gold Grunge 4 from Stock.xchng
Add City Boy Font from Dafont
Barcode Font by BarcodeInc
[sociallocker]
Step 1
The first thing you should do is a little research on the type of magazine cover you want to create. The style will depend on your topic. The types of magazine cover you can make is only limited to your imagination. Since we want our design to look professional, its a good idea to look at established designs of universally recognized magazines. After your research draw a thumbnails to plan out your design, so you can have a rough idea of what you need to design.

Step 2
The cover size will be 8″x10.5″ with a 0.125″ bleed on each side and a 0.25″ in Margin. If you cannot calculate the bleed size for the cover in Photoshop, it can be figured out easily in InDesign. Open InDesign create a new document at 8″x10.5″, Set the Margins to 0.25″, Click More Options, Set the Bleed to 0.125″. Click OK.

Draw a text box to fill the entire document, including the bleed, you will see that the entire document size is 8.25″ x10.75″.

Save the InDesign file, then open Photoshop and create a new document, set the Size: 8.25″ x 10.75″. and the Resolution to 300dpi. Click View > Rulers. Drag some guide lines to create your margins and bleed indicator.

Step 3
Insert the Second Jerusalem Temple model from Stock.xchng into your Photoshop document. name this layer background.

Step 4
Open the Portrait Girl in a Scarf from Stock.xchng

Change the image mode to grayscale. Image > Mode > Grayscale. Flip the image horizontally. Image > Image Rotation > Flip Canvas Horizontally.

Copy and paste the image into the Photoshop document above the background layer.

Use the quick selection tool to select the lady.

With the quick selection tool still active, click the Refine Edge Button.

Choose On Layers for the View Mode, you can switch between different modes to do adjustments to the mask.

Turn on Smart Radius and adjust the Radius setting to 13.0 pixels or whatever makes your particular image looks good. when you are done adjusting the mask, set the output to New Layer with Layer Mask and press OK.

Adjust your image, so that you have room for your text. My image is adjusted to the right of the page.

Step 5
Create a Masthead for the magazine with the Add City Boy Font from Dafont. Draw a text box with the type tool, below the layer with the lady and type the headline “THE EDGE”. Color #fdcf72

Apply a inner stroke to the Masthead, with color #e3d8be

Apply a inner Shadow, see settings below.


Step 6
Now we will color the eyes of the lady, Create a new adjustment layer, click the half moon symbol at the bottom of the layers palette and select Hue and Saturation, change the color to green, similar to the green in the background image.

Use a soft black medium size paint brush to mask out everything, but the eyes, use a small brush around the edges of the eyes.

Step 7
Open and insert the Gold Grunge 5 from Stock.xchng into your Photoshop document.

Set the Blending Mode to Soft Light.

[sam id=3 codes=’false’]
Step 8
Open and insert the Gold Grunge 4 from Stock.xchng into your Photoshop document.

Set the Blending Mode to Overlay and the Opacity to 18%.

Step 9
Create a Levels Adjustment Layer and adjust the levels.

Create a Color Balance Adjustment Layer and adjust the colors.

Create a Hue and Saturation Adjustment Layer above the background layer and reduce the saturation to -45.

Save the Photoshop File, name it Magazine Cover.
Step 10
Open the InDesign document we created at the beginning of the tutorial. Select the text box and place the Photoshop file. File > Place.

Choose a font family such as Helvetica for the cover text.
Helvetica Inserat LT Std -Roman 54pt – First Headline
Helvetica LT Std – Roman 18pt – Secondary Headline
Helvetica LT Std – Roman 11pt – Body Copy
Helvetica LT Std -Bold 10pt – Date and Pricing
Free 3 of 9 – Bar Code
Step 11
Draw a text box and type your Publish date and Price for the magazine.

Create your large headline make it overlap the Lady’s scarf, make the color C: 1 M: 16 Y: 86 K: 0

Create your secondary headlines, these should be much smaller.

Step 12
Create a mock up for your barcode placement. use the Barcode Font by BarcodeInc and type some random text.

Step 13
Now that we have added all the necessary elements to the cover, it is time to export it with crop marks and bleed marks in Pdf format. Click File > Export > Choose Adobe PDF (Print) > Name the file and click Save. The Export as PDF dialog box will pop up. Chose [Press Quality], and select preview after Exporting. (If you are sending the file by e-mail select Optimize for Fast web view.

Step 14
Select the the Marks and Bleeds tab. Select All Printer’s Marks and under Bleed and Slug, select Use Document Bleed Settings. Click Export.

Final Print Document

Conclusion
Creating a magazine cover from concept to design, can be a lot of fun. With a little research, planning and a good concept, you can create something that is quite stunning. Practice with other layouts, color arrangements and see what you can come up with. The trick is to keep things simple, balanced, exciting and unified.
Affordable Magazine Templates


[/sociallocker]


14 thoughts on “Create a Magazine Cover using Photoshop and InDesign”
Very nice tutorial. I am trying to make this one. Thanks for sharing.
visit
Excellent tutorial . Help me immediately
Good tutorial, spelled Israel wrong though
Thanks for that, bit confusing in parts as I am a total beginner with inDesign, but great practice so thanks again. Beautiful image too.
Awesome tutorial, I love the part where you use the grunge texture to give the cover a raggedy feel.
hhmmm nice
I’ll be using some of these techniques next semester in college! Keep up the great work, love the design!
hhmmm vry nice
Excellent. It is so nice to see someone give a great print tutorial. As you know, print is a totally different ball game than web, and its refreshing to see someone execute that well. I also really love that you showing doing a sketch before going to the computer. I do that, too. Thanks so much! Great work!
Thank you Jenny, that is a nice compliment 🙂
I have been a benefitiary in those tutorials thanks a great deal.
Ernest.
Great, I am always interested in those tutorial.
Ben
i enjoy this tutorial,,,so nice 🙂 thanks for sharing!!
Great tutorial thanks for the post